Turdbo Neon

Project log for the re-building of the 1997 Dodge Neon Sport

On the road again

Of the list of things to do from my last entry, I’ve completed all but one task, so I am ready for the OVR RallyCross Enduro Challenge on Saturday at National Trails Raceway in Columbus.

The new clutch took forever to get shipped from Autozone, but once it arrived I got it installed along with the new throw out bearing that was included and the used clutch cable that I sourced from the junkyard.  While I was waiting on the clutch, I spent some time with my rotary tool grinding on the gear selector pin and was able to get all of the “additional” metal off, so now all four Booger Bushings are solidly connected.  I also used some CRC MAF cleaner to start the process of cleaning off some of the oil, but I think that’s going to need a degreaser with a pressure washer.

Apparently, at the same time that bolt worked its way into the pressure plate, the connector for the coolant temp sender broke loose, so Megasquirt thought that the coolant was at about -40 degrees Fahrenheit.  That caused the computer to try to enrich the heck out of the mixture so a new connector and some electrical tape later all is good on that front.

For the bobble strut replacement, I’m trying an experiment.  I went to Ace Hardware and purchased a 10″ long 1/2″ eyebolt, a couple large washers, a 1/2″ nut, and a rubber stopper.  I put a hole in the center of the stopper, pressed the stopper into the eye of the eyebolt, put the washers on either side of the eyebolt, and used a couple old nuts from the parts car as spacers.  I bolted that up to the bobble relocation bracket attached to the K-member and then used an old sway bar end link bushing and some old washers from the parts car to bolt the top to the transmission.  I suspect that the eyebolt is going to slide off the rubber stopper, but we’ll see what it looks like after the next event.

For the hot-side pipe, I think the real solution is to do what the SRT-4 does and run the charge pip straight down from the turbo, under the transmission, in front of the oil pan, and then into the intercooler.  To do that, I’ll need some more exhaust bends and a lot of measuring, and a skidplate will get a lot more important.  For now, though, I’m just going to treat the rubber sewage reducing coupler as a consumable and keep a couple extras in the car.  Along with welding gloves.

All-in-all, except for the boost leak caused by a split in that coupler, I had it out last night and it’s running great.


Clutch teardown


After some thinking and discussing, I decided that the first problem to tackle is the clutch/transmission issue.  I did a cursory check of the timing and it seems okay, compression seems okay, and it looks/smells like the engine is running really rich, so it could be an out-of-whack sensor.  To more thoroughly test that, though, the car should be mobile, and I know there’s a bunch of noise coming from the transmission bellhousing, so that’s the first place to look.

I’m getting fairly good at this, so after not a lot of time, I had the transmission out of the car to take a look.  Incidentally, the longest part of the process was in trying to find some way to support the engine.  My solution was to put the front motor mount back on and only bolt it to the engine, not the transmission.  I also discovered that the bobble strut snapped, so I’m going to need to do something about that, but no big rush.

Once I had the transmission down, this is what I saw:

Oops.  Apparently, all that noise was caused by this bolt floating around in the bellhousing.

More pictures are in the Turdbo Neon Build Gallery.

Once I had confirmation that the clutch was, indeed, destroyed for the most part, I ordered a new modular clutch and throwout bearing for a 2003 Stratus 2.7.  It’s supposed to bolt right in, but have a bit more holding power than the Neon or the PT clutch.  I also took a trip to Besslers and found the singular 5spd Neon they had in the lot.  Fortunately, the clutch cable was still there, but it was a four-lug ’95 car, so it’s probably the oldest clutch cable that I could possibly get.  That said, it seems in better shape than the one that is in the car right now.

So now, I have a couple tasks that I can do while I wait for the clutch to arrive:

  • Source or build a new solid bobble
  • Clean the oil that sprayed all over the engine bay when the breather filter fell off
  • Swap the clutch cable
  • Work on measuring/building a new post-turbo charge pipe
  • Grind down the shifter attachment pin some more so the Booger Bushing stays in place

Success

WOR’s PE #3 was today.  First in class.  First overall.  Booyah.

That win came at a cost though:  In my 8th run of the day, something went wonky with the clutch and the car started missing terribly.  I know that the clutch cable was weak, at best, but something is clanging around and the clutch is basically ineffective.  The really worrisome part, though, is that the car doesn’t want to idle or rev even with the transmission in neutral.

First task is to drop the transmission and see what’s going on in there.

Smoothing out the Wrinkles

I did not take the cat to PE2:  too far, too much money, and too early in the morning.  I do, however, have official Kentucky tags for the car and have driven it for about 75 miles or so on the public streets.  The exhaust is Frankensteined together, but I should probably get a full front-to-back section.  Time for a new list of things that need to be tweaked:

– Speed sensor is shot
– Fuel sender is out of whack
– Nasty vibration in the front end that I think is an unbalanced tire
– Boost leak
– Exhaust is banging around
– Stalls when coming off throttle to a stop
– I suspect that the clutch cable has had it and is all stretched out

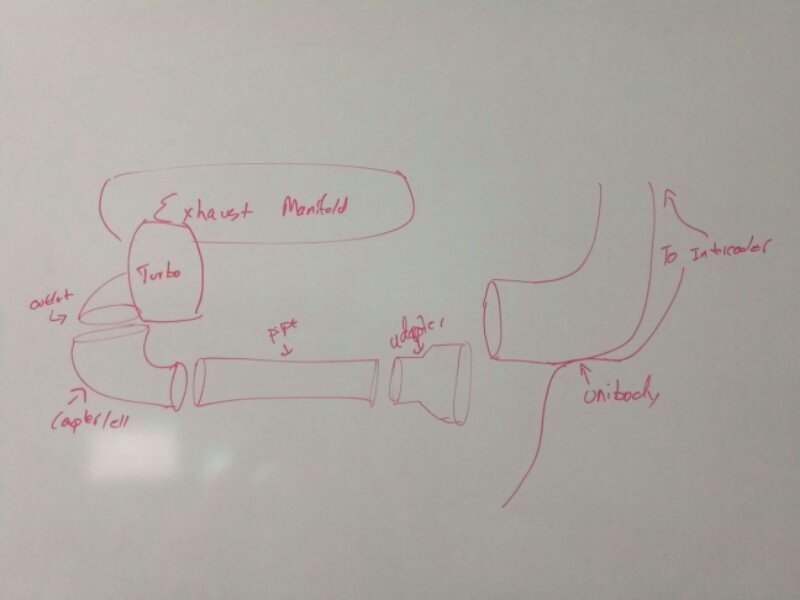
I think that the boost leak is a result of the charge pipe coupling that is behind the motor, under the exhaust manifold.  I’ve replaced the coupler/adapter twice due to a tear and I think it has torn again.  The basic problem is that I am going from the smaller diameter turbo output to the larger charge pipe diameter, plus the turbo outlet is lower than the charge pipe.

image

I need to find a better way to adapt from the smaller output size to the larger pipe size and a way to line things up better.  Unfortunately, the unibody is in the way of the intercooler pipe going any lower.  Maybe cutting the end off and angling it differently would work better.  We shall sèe.

Prepping for 2012 PE#2

Interestingly enough, I do not have a mad dash to get anything completed with the car before the next event.  The biggest problem I needed to solve was actually finding a tow vehicle since mine will be with my wife in Florida, but Dad’s going to let me take his truck.  PE#2 is going to be an OVR event at National Trails, so it should be a pretty fast, fairly dried-out course.  I will take the mud tires, but it is likely that I won’t need to change out the gravel tires while I’m there.  Setup-wise, I think it’s best out go with the car as-is.  The idle is smoothed out a bit with the recent change to the reqfuel number and the switch to simultaneous injections, and it seemed that the car was pulling very well at PE#1 at every level of the tune.  The only work that needs to be done is the re-installation if the exhaust.

For the exhaust, I am going to make sure that I’m using a u-bolt clamp to hold the flex tube to the down pipe.  I think that the current clamp is more of a sleeve type, and it doesn’t seem to hold real well.  I will also need to find some new places to hang the exhaust from as the bracket that I was using appears to have broken off.  The section that goes over the rear suspension will need to be cut and have a new elbow clamped in.  Eventually, I want to replace the current cheapo flex pipe with a true stainless braid flex section, but I need to do some measuring first and probably don’t have time to do that before the next event.

Finally!

The new CV went in with about an hour’s labor.  After that, a quick trip to the courthouse resulted in a passed inspection with no need to bring out a tow truck.  The idle was a little rough, but once some throttle is applied, the car pulled very strong.

The first Rally cross of the year for WOR was May 5th and, primarily due to the mud tires, the car took first in class, second overall.  Not only did it run great for all 11 of my runs, Tim ran four of his runs in the car too.  The exhaust fell off, but the car was driven back on to the trailer. 

All in all, it looks like the gremlins are finally worked out.

So close…

I got home a little early yesterday with a plan to take the car to the courthouse to start the process of getting the rebuild title application started.  The good news is that it ran absolutely fantastically.  The bad news is that it pulled so hard that it disintegrated the driver side inner CV joint.  When I was putting the transmission in, the CV felt a little funny, but it seemed okay.  Apparently it was no good.  So, I had the car towed back home.  I got a new axle and spent just under an hour getting it installed, so hopefully I’ll be able to find some time next week to get it to the courthouse.

At this point, I need a new coupler for the rear charge pipe and I need to fix up the hood pins, but otherwise it is ready for rally cross.

I hope.

New fuel pump installed

The new Walbro pump arrived in the mail today.  It took about 2.5 hours, all in, but the pump is installed.  I didn’t have much time to try to drive the car, but I did watch the fuel flow and it’s extremely strong now.  A quick start up with the right reqfuel number had a pretty good idle.  More details when I have a chance to give it a test drive,

Fuel pump on order

I got the new FPR installed last night.  It’s a pretty easy job that doesn’t require dropping the tank — I just jacked up the rear of the car and reached up under the rocker to get right to it.  Unfortunately, there’s no way there’s enough room to remove the fuel pump assembly through the same method.

While the new filter/regulator seems much less restricted, it wasn’t the source of the problem, as I suspected.  On a long shot, I also tried putting 5 gallons of gas in the tank to see if maybe it was just out of gas, but I still get no fuel flow at the fuel rail, so I think the fuel pump is shot.  To that end, I have a new Walbro 225l pump on order from Modern Performance.  It should be here on Wednesday, and I should be able to get it in without too much trouble.

Have I Finally Found the Root Cause?

In my efforts to get the car to the courthouse to get it inspected, I ran in to some pretty serious problems getting the car to run.  Basically, it’s suffering from the same things that have plagued it for the last year.  When I finally got it back in to the garage, I started doing some pretty radical things to the tune to see what would happen and I found that aside from giving it some pretty outlandish settings, it ran pretty much the same, no matter what.  I checked spark on all four plugs, and that was good.  I wanted to try testing the injectors to see if they were all firing, and as part of that, I went to disconnect the fuel line from the injector rail.

Nothing came out.

I left it disconnected, put a bucket under it, and tried cranking.  No fuel.   The next night, I got a jumper wire and tried running the fuel pump.  I can hear the pump running, but I get a very sporadic splash of gas here and there. 

Tonight I’m going to try a new fuel regulator/filter.  If that doesn’t work (and I don’t expect it to), I’m going to order the Walbro pump from Modern Performance and drop the tank.