Author Archive: wae

Next Project: Edward Scissorhands (with a twist)

The next project that my wife has decided that I will undertake is to make the fully functional (but not actually sharp) scissorhand gauntlets for her Edwina Scissorhands cosplay.  I’ve done a little bit of sketching and drawing, but today I built a couple prototypes.

My first prototype didn’t survive long enough to get its picture taken, but it served its purpose very well by teaching me a little bit about things like scissors and how they articulate.  Based on my experience with that, I was able to whip up a new prototype that seemed to actually work quite well.

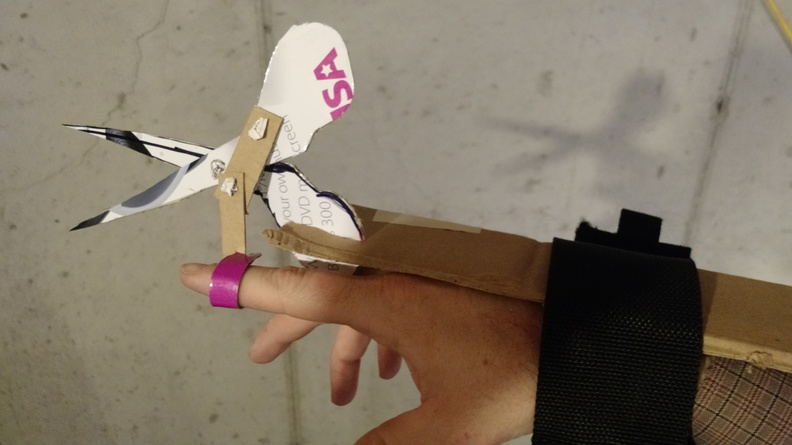
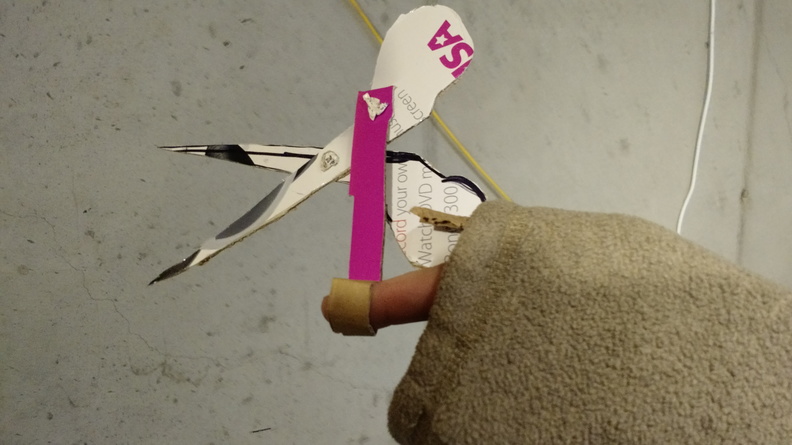
The prototypes were made from cardboard with bread ties as the hinge pins.  The second prototype utilized a push rod with an articulation point.  The first prototype seemed to indicate that it would be required, but upon some testing it was obvious that the additional hinge was simply going to be a place for things to go wrong.  Regardless, here it is, mounted on a length of cardboard and Velcro-strapped to my arm:


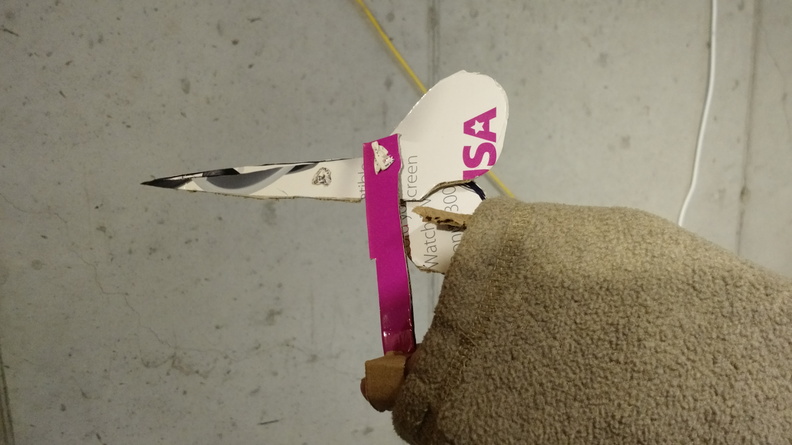
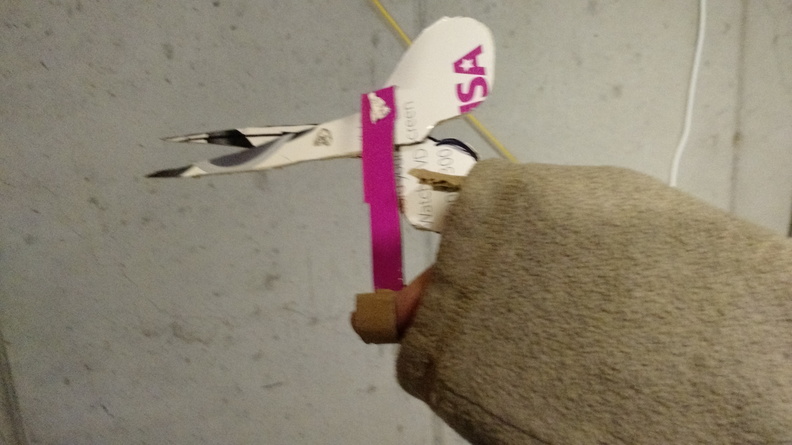
I took out the articulated push rod and replaced it with a straight bit, then mounted the apparatus up my sleeve to simulate a hand more closely:

This seemed to actually work pretty well, and seems to fit the overall design for the costume, according to The Boss.  I envision this existing at the end of a long sleeve, loose enough and long enough to be able to get the hand all the way to the end, with the scissors being somewhat close to where the hand would normally be.

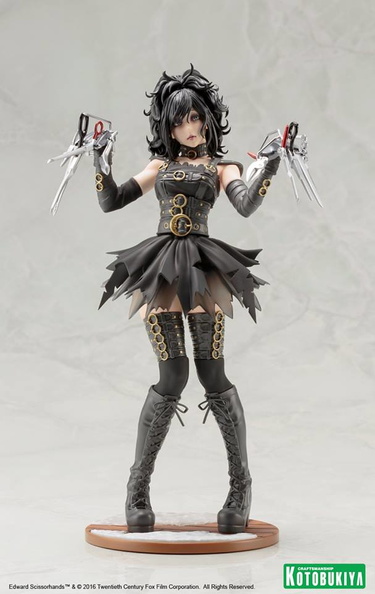
Roughly speaking, I’m trying to build towards this:

Once I have the mechanism down, I’ll start trying to replicate the look of the individual shears.  And as I review this post, I see that I need to re-adjust how the shears mount since they appear to be at a right angle to the wrist such that when the arms are held straight out, the shears point down.

IT’S ALIVE!

Now, I’m not going to go and say that it’s “done” or that it’s “ready”, but I will admit to having taken a six mile drive tonight with no trailer or tow truck required!

The tune isn’t great, the alignment is off, the blow off valve isn’t working, I need to get a power steering belt, and there’s some sort of boost/vac leak going on.  But, I drove it and it can pull really hard, even with a boost leak, set for only 7 pounds of boost, and without me really pushing it very hard at all.

I have become all that I hate

I got the oil filter adapter installed.  Oil pressure and oil temp gauges appear to be working.

Problem is, the way the oil cooler is mounted, the oil filter cannot be installed with the sandwich plate adaptor.  There isn’t enough clearance to thread the filter with the hot side pipe installed.  So now, in order to do an oil change, the hot side pipe must be removed.

Good news, though, is that the reservoir for the coolant is installed, the PCV system is almost complete, and antifreeze and oil are in the engine.  All the wiring is complete, and MegaSquirt is all wired in and good to go.  I still need a little more hose to run the catch can to the intake manifold.  The radiator has coolant, but it needs some distilled water.  The boost controller needs to be installed.  And I need to put the axles in and fill the transmission. Then I can try to start the car.  I turned it by hand a little and then actually let the starter turn the motor a little bit.  So far, so good.

  1. PS belt
  2. Distilled water for cooling system
  3. Get hose for PCV system
  4. Install boost controller
  5. Torque down O2 sensor
  6. Install axles
  7. Fill transaxle
  8. Try to start engine
  9. Re-install front end

And closer still

The last couple days have been spent doing small things that make big progress.  I’ve got the wiring mostly taken care of.  I still need to run the wires to the gauges, but other than that, I think the wiring is good to go.  Here’s the view from under the core support for the wires that need to cross the engine bay:

It is going to be critical to have oil pressure readouts, so I needed to repair the oil pressure sender:

That post snapped off a while back so I tried a couple things to get it repaired.  My first attempt was to use a torch and alumaweld to permanently attach a wire to what was left of the stud.  That didn’t work, but it did melt the plastic and allow me to pull the stud out, exposing the wire.  From there, I soldered on a new wire, covered it with shrink tube, and then used RTV to fill in the hole.  It seems pretty solid, so I’m going to give it a try and see if it works.

The cooling system is all buttoned up now, with the radiator and fans in place, plus the hose clamps for the heater core lines and the metal strapping in place to support the lower line to the heater core.  I also got the high pressure side of the intake all clamped down.

The list:

  1. PS belt
  2. Re-install MegaSquirt
  3. Install PCV system
  4. Run wires for gauges
  5. Add hose barb to air cleaner pipe for valve cover breather
  6. Torque down O2 sensor
  7. Install oil filter sandwich adapter
  8. Install oil filter
  9. Fill engine with oil and turn by hand a few times
  10. Install axles
  11. Fill transaxle
  12. Try to start engine
  13. Re-install front end

Slow weekend

I had soccer games plus a friend that needed a muffler welded back on, so I didn’t get much done this weekend.  So much for my ambitions to start the car by Sunday.

I decided to use the GM sensor that was part of the original MegaSquirt setup for the IAT and the DOHC CLT sensor.  Using TunerStudio, I set the calibration from the drop down boxes for those sensors and they seem to be sending rational values.  The O2 sensor is a real PITA, though.  I’m not convinced that it is truly linear and the voltage at 14.8 with the sensor unplugged (per the manual’s suggestion) is different than the voltage at 14.8 with the sensor connected.  I re-ran the ground wire for the O2 to the same p,ace as the MS grounds, though, and it seems to be closer on the lean side of the scale at least.  I also ran a ground wire for the ignition box so that I can hook that up.

Some grinding on the front bracket for the torque strut gave me the clearance I needed to get the hot side pipe run and I got the wiring from the alternator to the starter routed.  I utilized a good number of insulated clamps to secure the wiring around the front and passenger side of the engine and bought some more split loom to protect the wires and some hose clamps to complete the heater core connections.  

The list:

  1. PS belt
  2. Run wires across front and right side of engine (50% complete)
  3. Put hose clamps on water hoses to hardline and heater core
  4. Install radiator
  5. Install cooling fans
  6. Re-install MegaSquirt
  7. Install PCV system
  8. Add hose barb to air cleaner pipe for valve cover breather
  9. Install cold-side pipe
  10. Torque down O2 sensor
  11. Install oil filter sandwich adapter
  12. Install oil filter
  13. Fill engine with oil and turn by hand a few times
  14. Install axles
  15. Fill transaxle
  16. Try to start engine
  17. Re-install front end

Closer still…

No recent updates, but I have been working on things.

The wiring has been a real PITA.  Not difficult, just very tedious.  At this point, I have the engine wired, though, and gave it a minor electrical test.  The battery is reconnected, and power seems to flow to the electrical systems:

That is MegaSquirt2/Extra code getting loaded.  Exciting times, Goose.

One weird problem that I need to troubleshoot:  The ASD and fuel pump relays both need to be fired up from the MS fuel pump relay output.  In order to do that, I’ve added a third relay so that the MS will power the relay which will, in turn, power both the ASD and fuel.  The diagram I found indicated the need for a diode to prevent the fuel pump and ASD relays from feeding in to each other, but it looked like the diagram showed the diodes installed backwards, so I installed them the way I thought they should be.  Now, as soon as I plug in the MS controller – even with the ignition off – the fuel pump turns on.  So, MS is powered down, but we’re pumping fuel.  Apparently I got too smart for myself.

MS is responding to throttle input and sees the O2 sensor and the CLT sensor, but I haven’t calibrated any of the other sensors or anything yet.  For now, I’m going to leave the IAC disconnected like it was before and I’ll worry about that later.  Likewise on the tach output.  I completely don’t understand the schematics that I’ve found from the Megamanual, so I’ll get back to that later.

The list:

  1. PS belt
  2. Run wires across front and right side of engine
  3. Connect water hoses to hardline
  4. Connect heater core water hoses
  5. Install radiator
  6. Install cooling fans
  7. Re-install MegaSquirt
  8. Install PCV system
  9. Add hose barb to air cleaner pipe for valve cover breather
  10. Install intake pipes and hoses (I think the hot side pipe that I want to try to use is still at the storage garage)
  11. Install PT air temp sensor
  12. Torque down O2 sensor
  13. Install oil filter sandwich adapter
  14. Install oil filter
  15. Fill engine with oil and turn by hand a few times
  16. Install axles
  17. Fill transaxle
  18. Try to start engine
  19. Re-install front end


Just a few minutes in the garage last night

Minor progress last night, but a couple things off my list. The throttle body is on, the exhaust is bolted up, both new engine mounts have some paint on them, and the solid bobble strut is re-installed with prothane bushings. That leaves my list like this:

  1. PS and ALT belts
  2. Wire up voltage regulator
  3. Build torque strut
  4. Connect water hoses to hardline
  5. Connect heater core water hoses
  6. Wire engine
  7. Install radiator
  8. Install cooling fans
  9. Install MS2/Extra firmware
  10. Re-install MegaSquirt
  11. Install PCV system
  12. Add hose barb to air cleaner pipe for valve cover breather

I’m sure that list will wind up growing before I’m all finished, but that’s what’s on my radar at this point.

7/16 is Smaller Than 12mm

I realize that it is kind of obvious that 12mm is physically larger than 7/16″.  In fact, it’s about 1/32″ of an inch bigger.  Basically, we’re talking about 15/32″ versus 14/32″.  It doesn’t seem like much.

I got the rest of the parts for the engine torque strut today, so I went ahead and welded everything together:

It worked out pretty well, although I did need to cut a couple inches off the tube I bought.  When I measured the length that I thought I needed, the engine was rocked way back on the side mounts.  Anyway, that part went fine.  The problem I ran in to is that the bolt hole that I need to connect the strut to is metric.  12mm specifically.  I think you know how this is going to end.

The good news, though, is that while an M12 bolt will not fit through the rod end bearing, a 7/16″ threaded rod will slide through an M12 thread!  So, my plan is to acquire a couple 7/16-14 nuts to lock a threaded rod in place through the hold in the mounting bracket on the front of the engine.  That will give me a stud, basically, to run the rod end bearing through.  On the other side, I bent up a bracket and put the 7/16″ holes in the legs.  I still need to drill the hole for the attachment to the control arm, but to attach the heim joint, I’m going to get a 7/16″ bolt and nut plus a brass spacer.  I’ll cut the spacer so that there’s a little bit of space on either side of the joint and it rests roughly in the middle of the bracket.

I worked on a few other things so that in the end, I left the engine bay looking like this:

Tim came over and gave me some help tonight.  Specifically, he was able to work out how I need to modify the coolant hard lines to accommodate the intake manifold and the heater core connections.  Basically, I’m going to chop up the hard lines some more to separate the return and the source lines.  That way I can angle things a little better.

In addition to that, we got the shifter and clutch cables hooked up — part of the hardline re-routing is to keep it out of the shift cable bracket!  The thermostat is installed along with the fill pipe.  We also got the power steering reservoir bolted up to the head using some old nuts as spacers.  Amazingly, the return line for the P/S system actually fit, so I don’t think I need to get a new hose for that, so that’s good!

I also picked through the wiring harnesses that I have from the 1gn and from the PT and went ahead and plugged in the various connectors to their sensors.  Additionally, I started running the new vacuum lines.  Little things, to be sure, but now the wiring portion of the project can get underway and I can work on how I route everything.  Overall, a night of good progress!

  • PS and ALT belts
  • Wire up voltage regulator
  • Gaskets for throttle body
  • Build torque strut
  • Add bushings to bobble strut*
  • Connect throttle cable
  • Connect water hoses to hardline
  • Connect heater core water hoses
  • Connect exhaust
  • Wire engine
  •  Install radiator
  • Install cooling fans