So far, our Saab resurrection project was moving along nicely. It had been only a couple weeks and the car was starting and running on its own power. So the next three projects all got kicked off at once: Replacing the ignition switch; Replacing the tires; Performing a tune-up.
The tune up parts were bought from Rock Auto and shipped out. The tires were a gift from Tim. He had these tires that were basically unused that were the right size for me on his S10. He wanted larger tires for it, so if I took his 16″ rims and the new tires he bought and had them mounted up, I could have his old 15″ tires.
For the ignition switch, I went shopping for a replacement and they needed to use smelling salts to get me off the floor. If you could find one, the going rate was $140. For a relatively simple switch mechanism! Granted, Saab did some weird things with their ignition switch and I wanted to keep it as Swedish Normal as possible. First of all, the ignition switch is down in the center console, between the seats. Then they have a lock cylinder which is connected to the actual electrical components by way of a linkage and gear. And the spring-back from “start” to “run” is managed by a spring inside the electrical bit, not by the mechanical lock cylinder. Whatever we were going to do, the switch was going to have to come out of the car, though, so it was time to dismantle the center console.
Taking the center console apart isn’t as simple as it sounds, though. While the various plastic bits come off as they would in any other car, the bolts for the cover over the switch are located underneath the gearshift assembly. In manual transmission cars, removing that assembly to get to those bolts requires dismantling the shift linkage. At this point, please make sure you are sitting comfortably and the device you are using to read this is secured because the next sentence is as shocking as it is provocative.
I sure am glad this car is an automatic!
That will be the first and likely last time I will use those words all strung together in that manner. In this very specific case, though, the automatic transmission linkage is trivial to disconnect and reconnect, so the whole assembly could be removed from the car and set on the workbench.
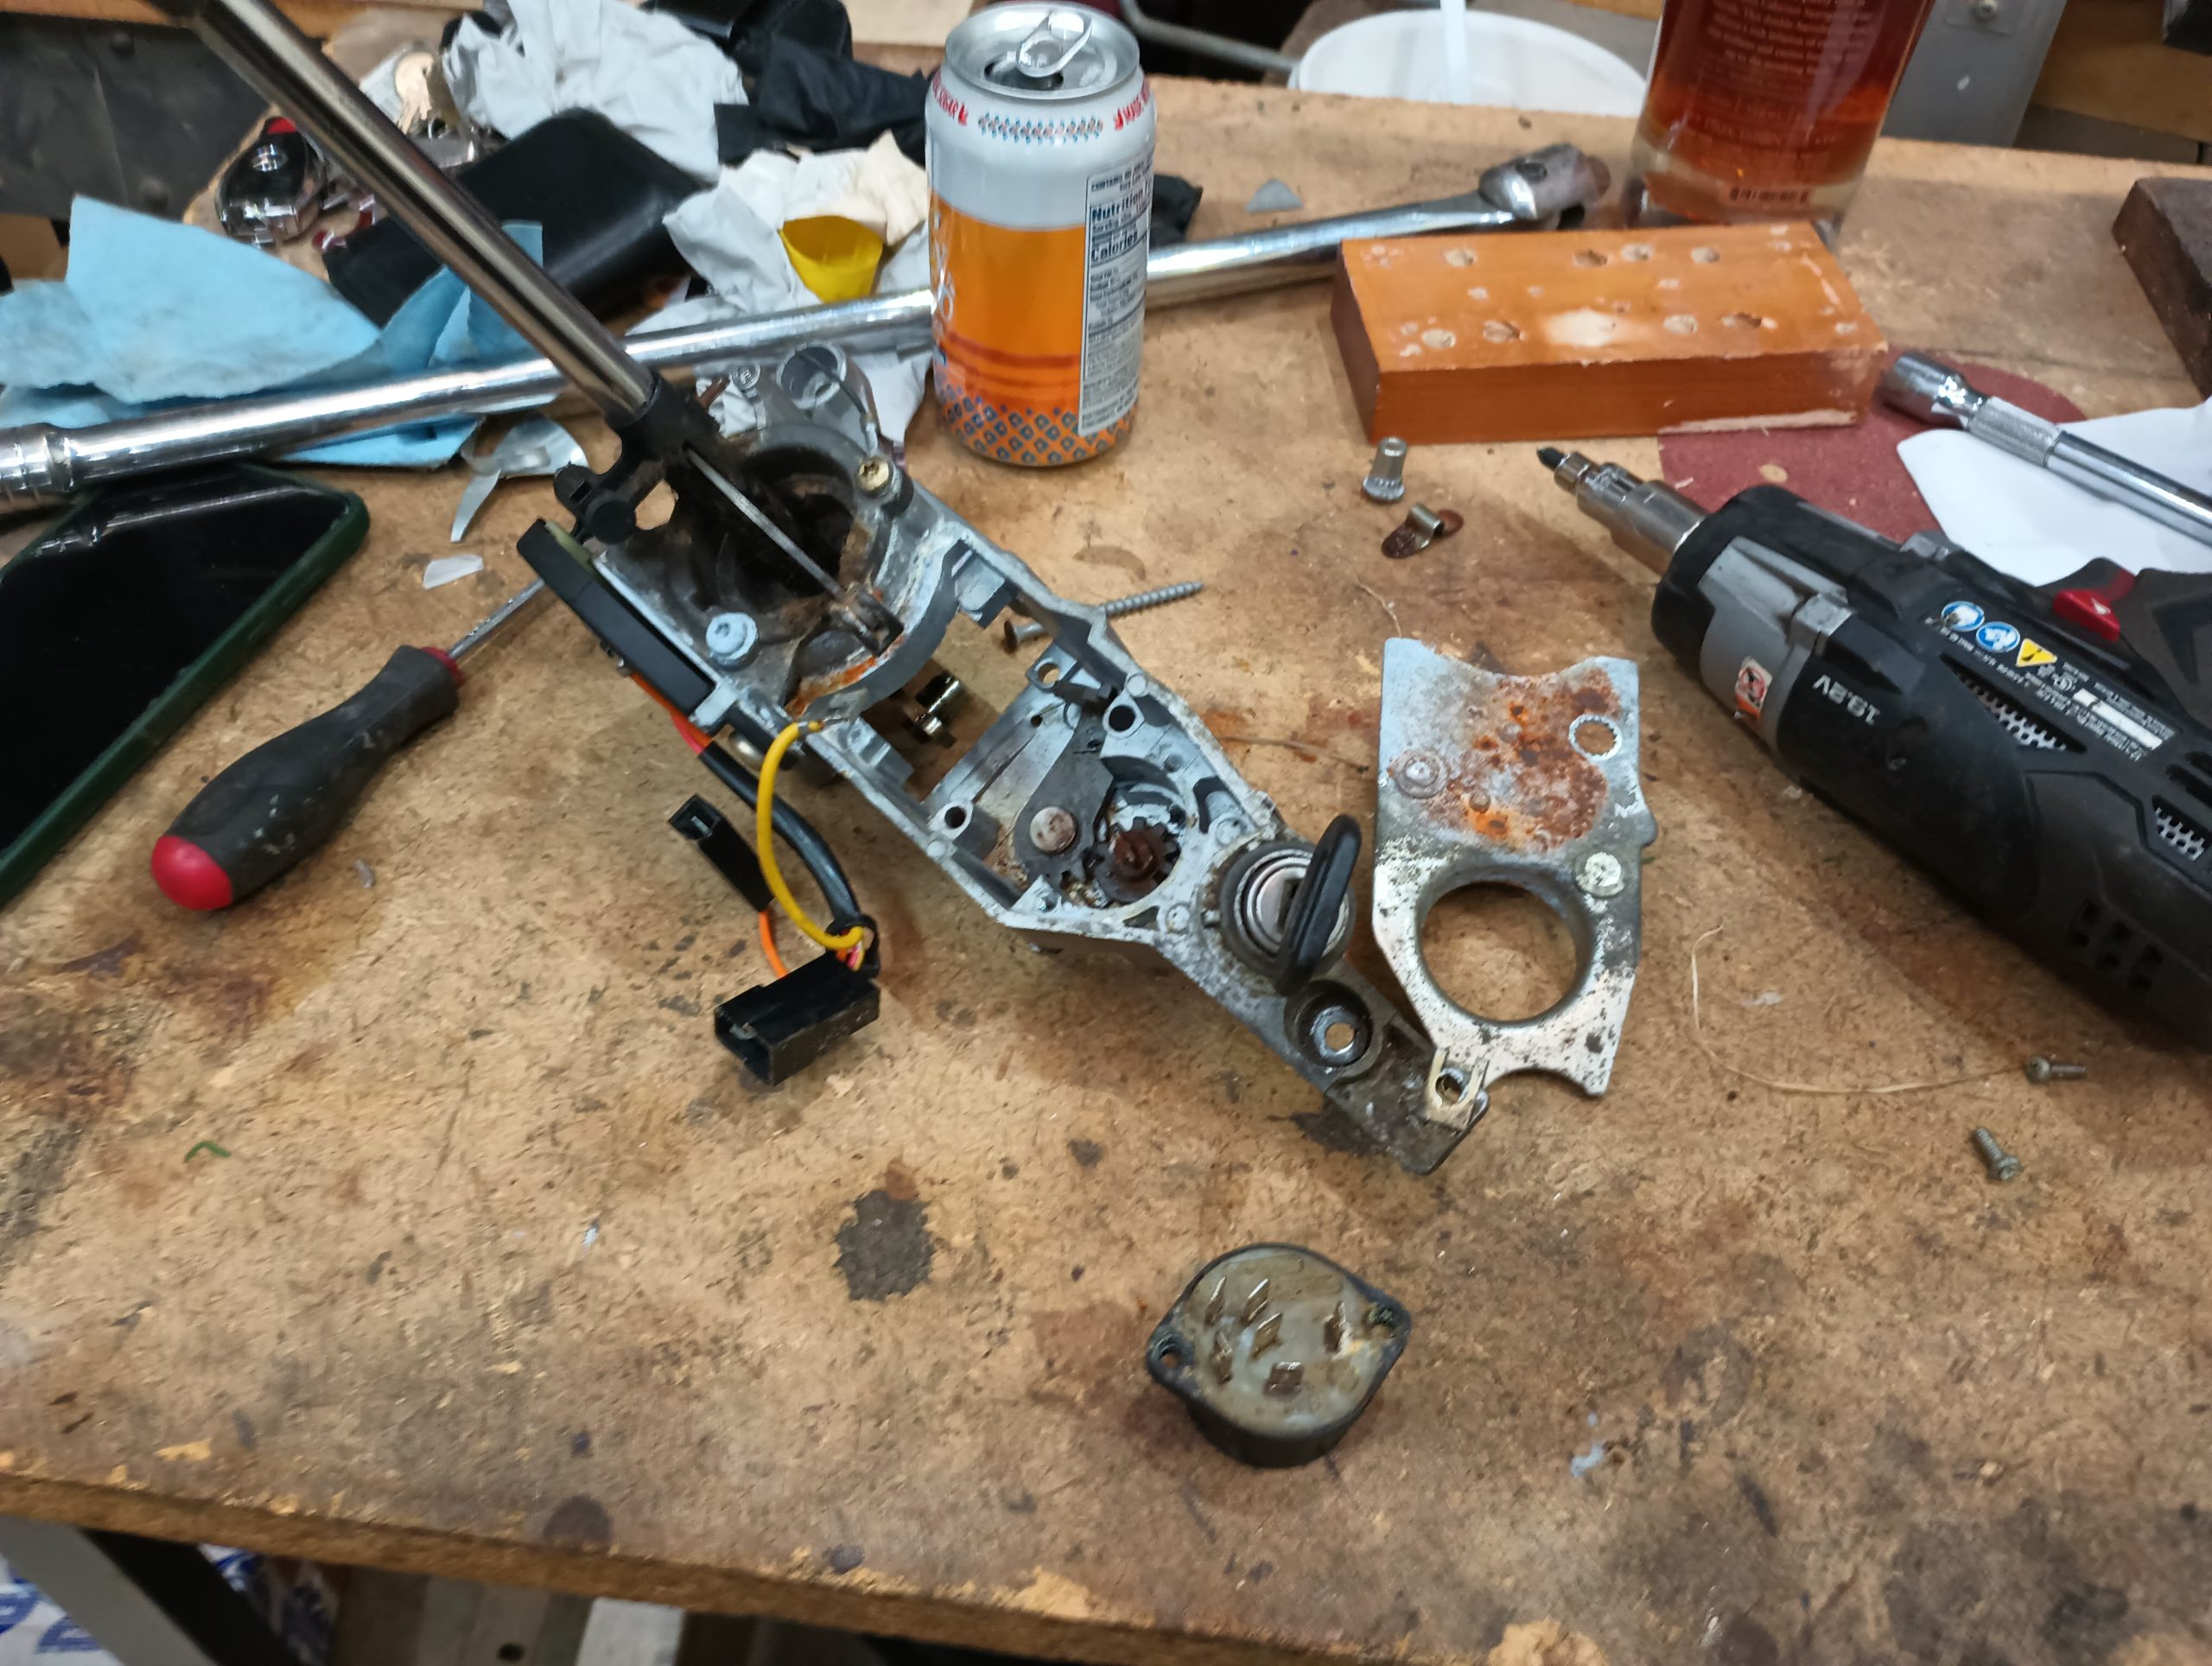
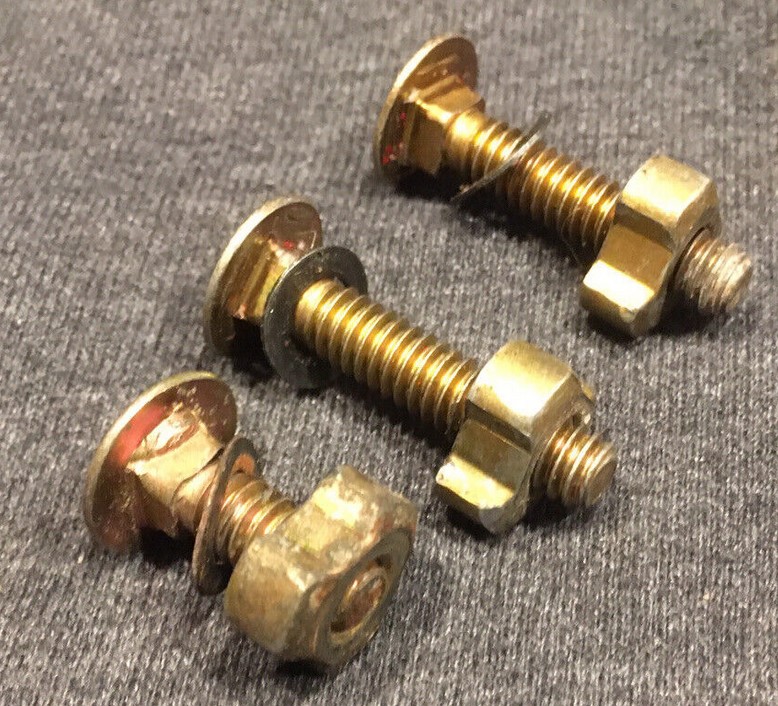
Removing that assembly wasn’t completely without difficulty, however. As a theft-prevention measure, those wacky aerospace engineers at Saab used a trio of carriage bolts fitted with triangular-shaped nuts to hold the assembly down.
No socket sold in stores around town is going to fit that and it seemed foolish to spend money for a tool that I’m not going to use very often at all. A knock-off design of the socket was available from a website I’d never heard of before for about $25, but I had an 11mm socket I didn’t care about and an angle grinder. After a few minutes of grinding away, I had a three-point socket that just barely fit. With the electric impact and a lot of downward pressure – I mean a LOT a lot! – all three nuts came loose. Just like our team motto from the first GRM Challenge we ever did back in 2005: It’s not just good. It’s good enough!
With the switch removed from the car, it was pretty easy to see that it was a plastic housing that had a plastic cap latched in, so it was pretty easy to use a flat-blade screwdriver to open it up and take a look. What a horror-show of corrosion!
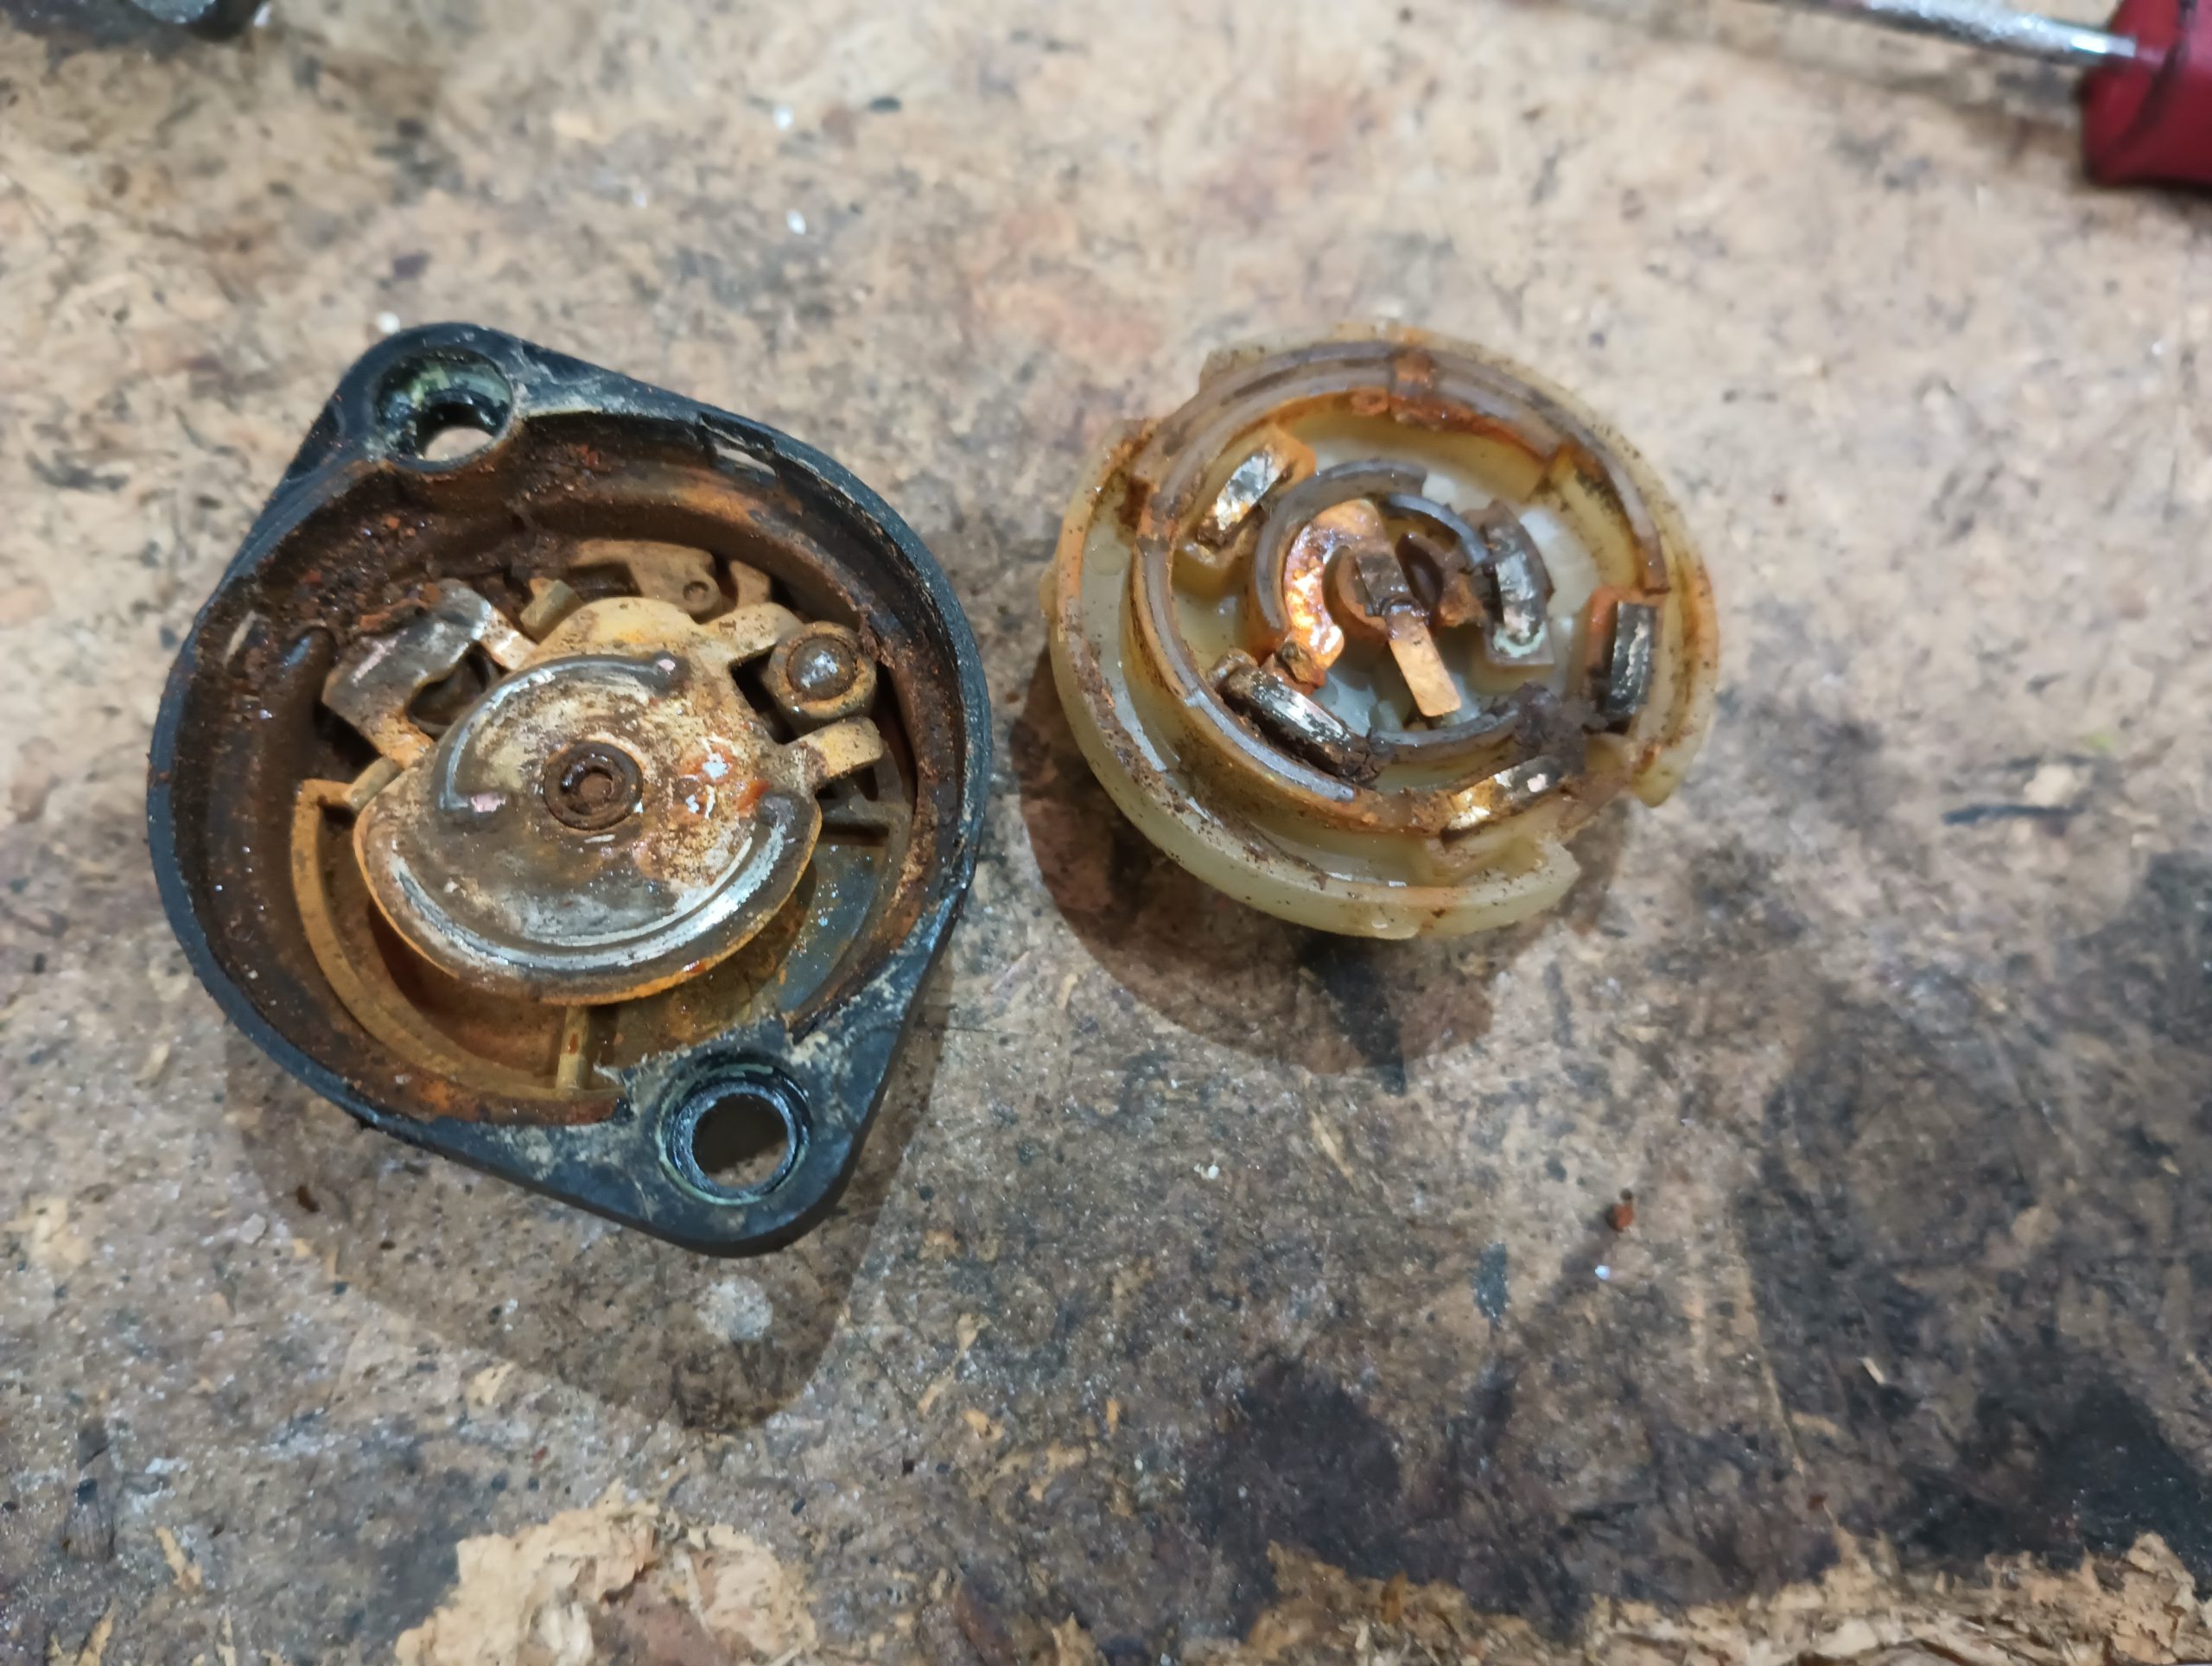
The mechanism, however, is actually quite simple. There are the sets of contacts, a spring to push the contacts together, and a second spring that flips the switch back from “start” to “run”. The contact spring had rusted into oblivion, but the rest of the switch could be cleaned up and lubricated. For 89 cents, I sourced a replacement spring from the local hardware store and saved myself about $139.11.
Riding high on the success of that switch repair, I tackled the switch that controls the interior lights and found it similarly corroded.
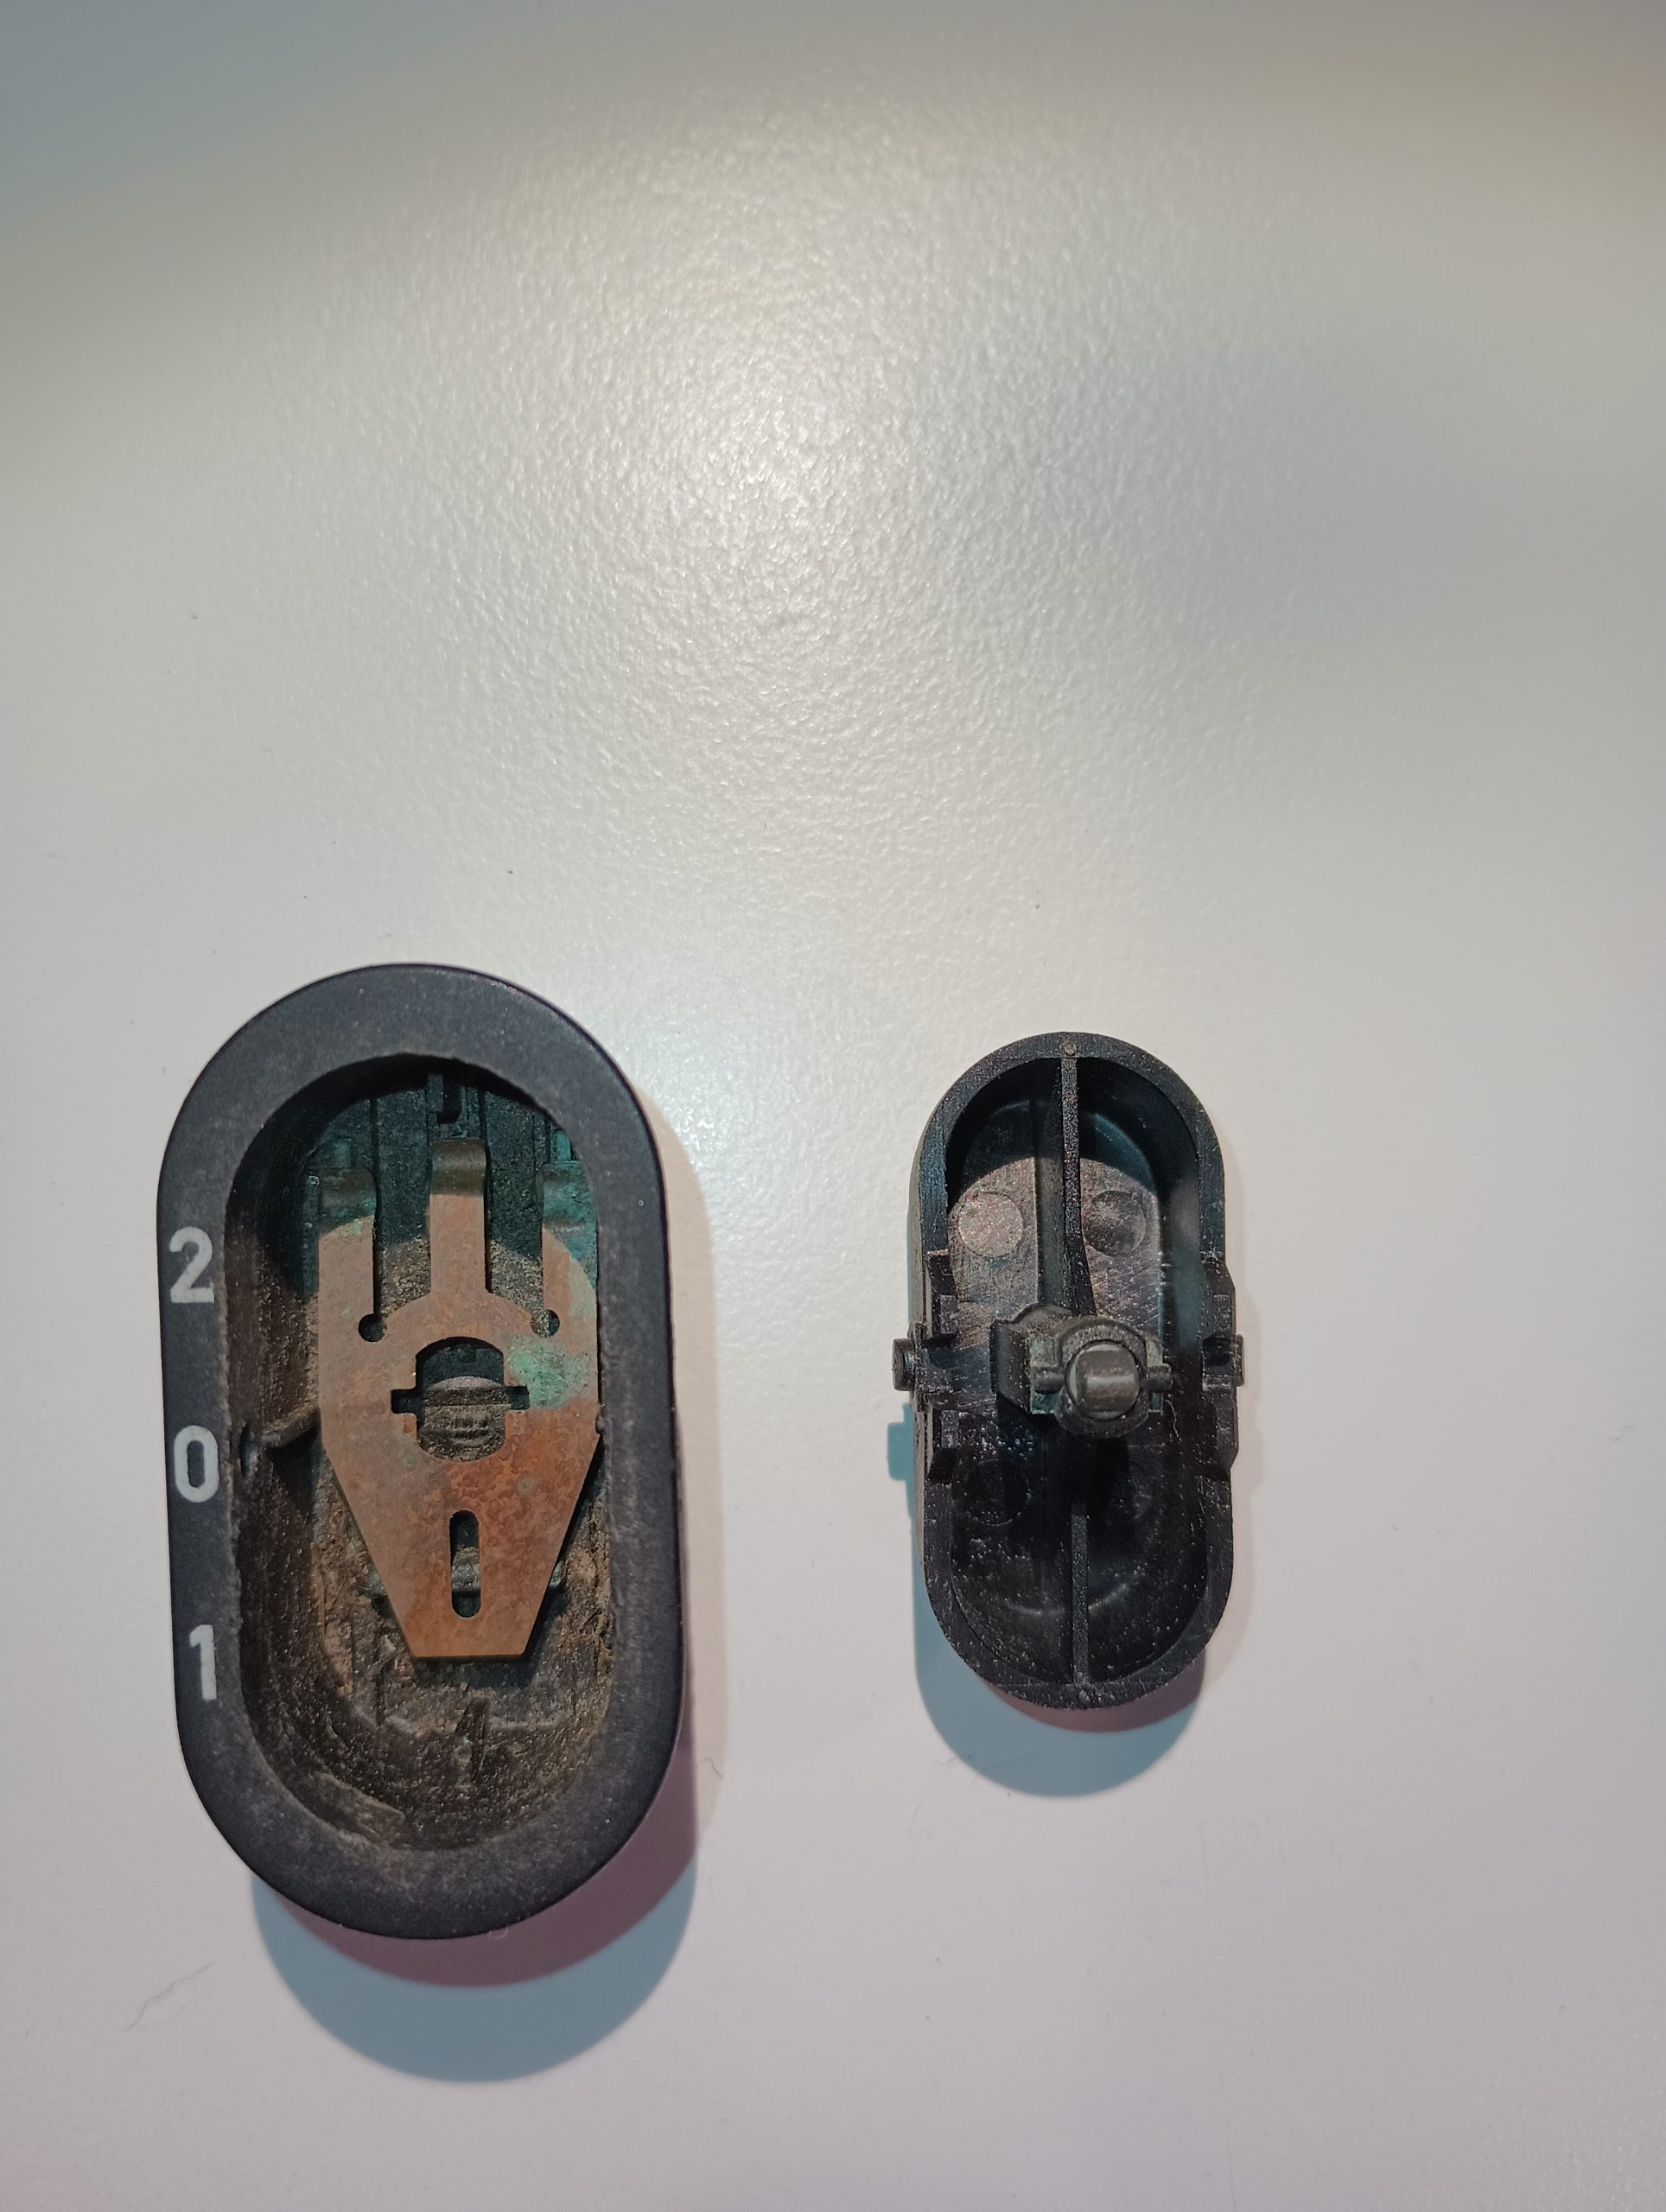
This switch was a bit less complicated with just a couple copper bits on the inside that provided the contacts as well as the spring function, but a little bit of sandpaper had the contacts gleaming again and I was able to quash the resistance that the corrosion was injecting.
With that done, we were ready to get the tires on, button everything back up, and start worrying about replacing the top, so we got the switches installed and started it up and – oh, that’s not right. There were lights on the dash and no power assist from the brakes. We had all the brake-related lights turned on and the oil pressure and charge lights were on very dimly. The dash lights I could have lived with for the time-being, but the fact that the brake system wasn’t working kind of put a stop to the whole thing. Or rather, it made it somewhat difficult to put a stop to it!
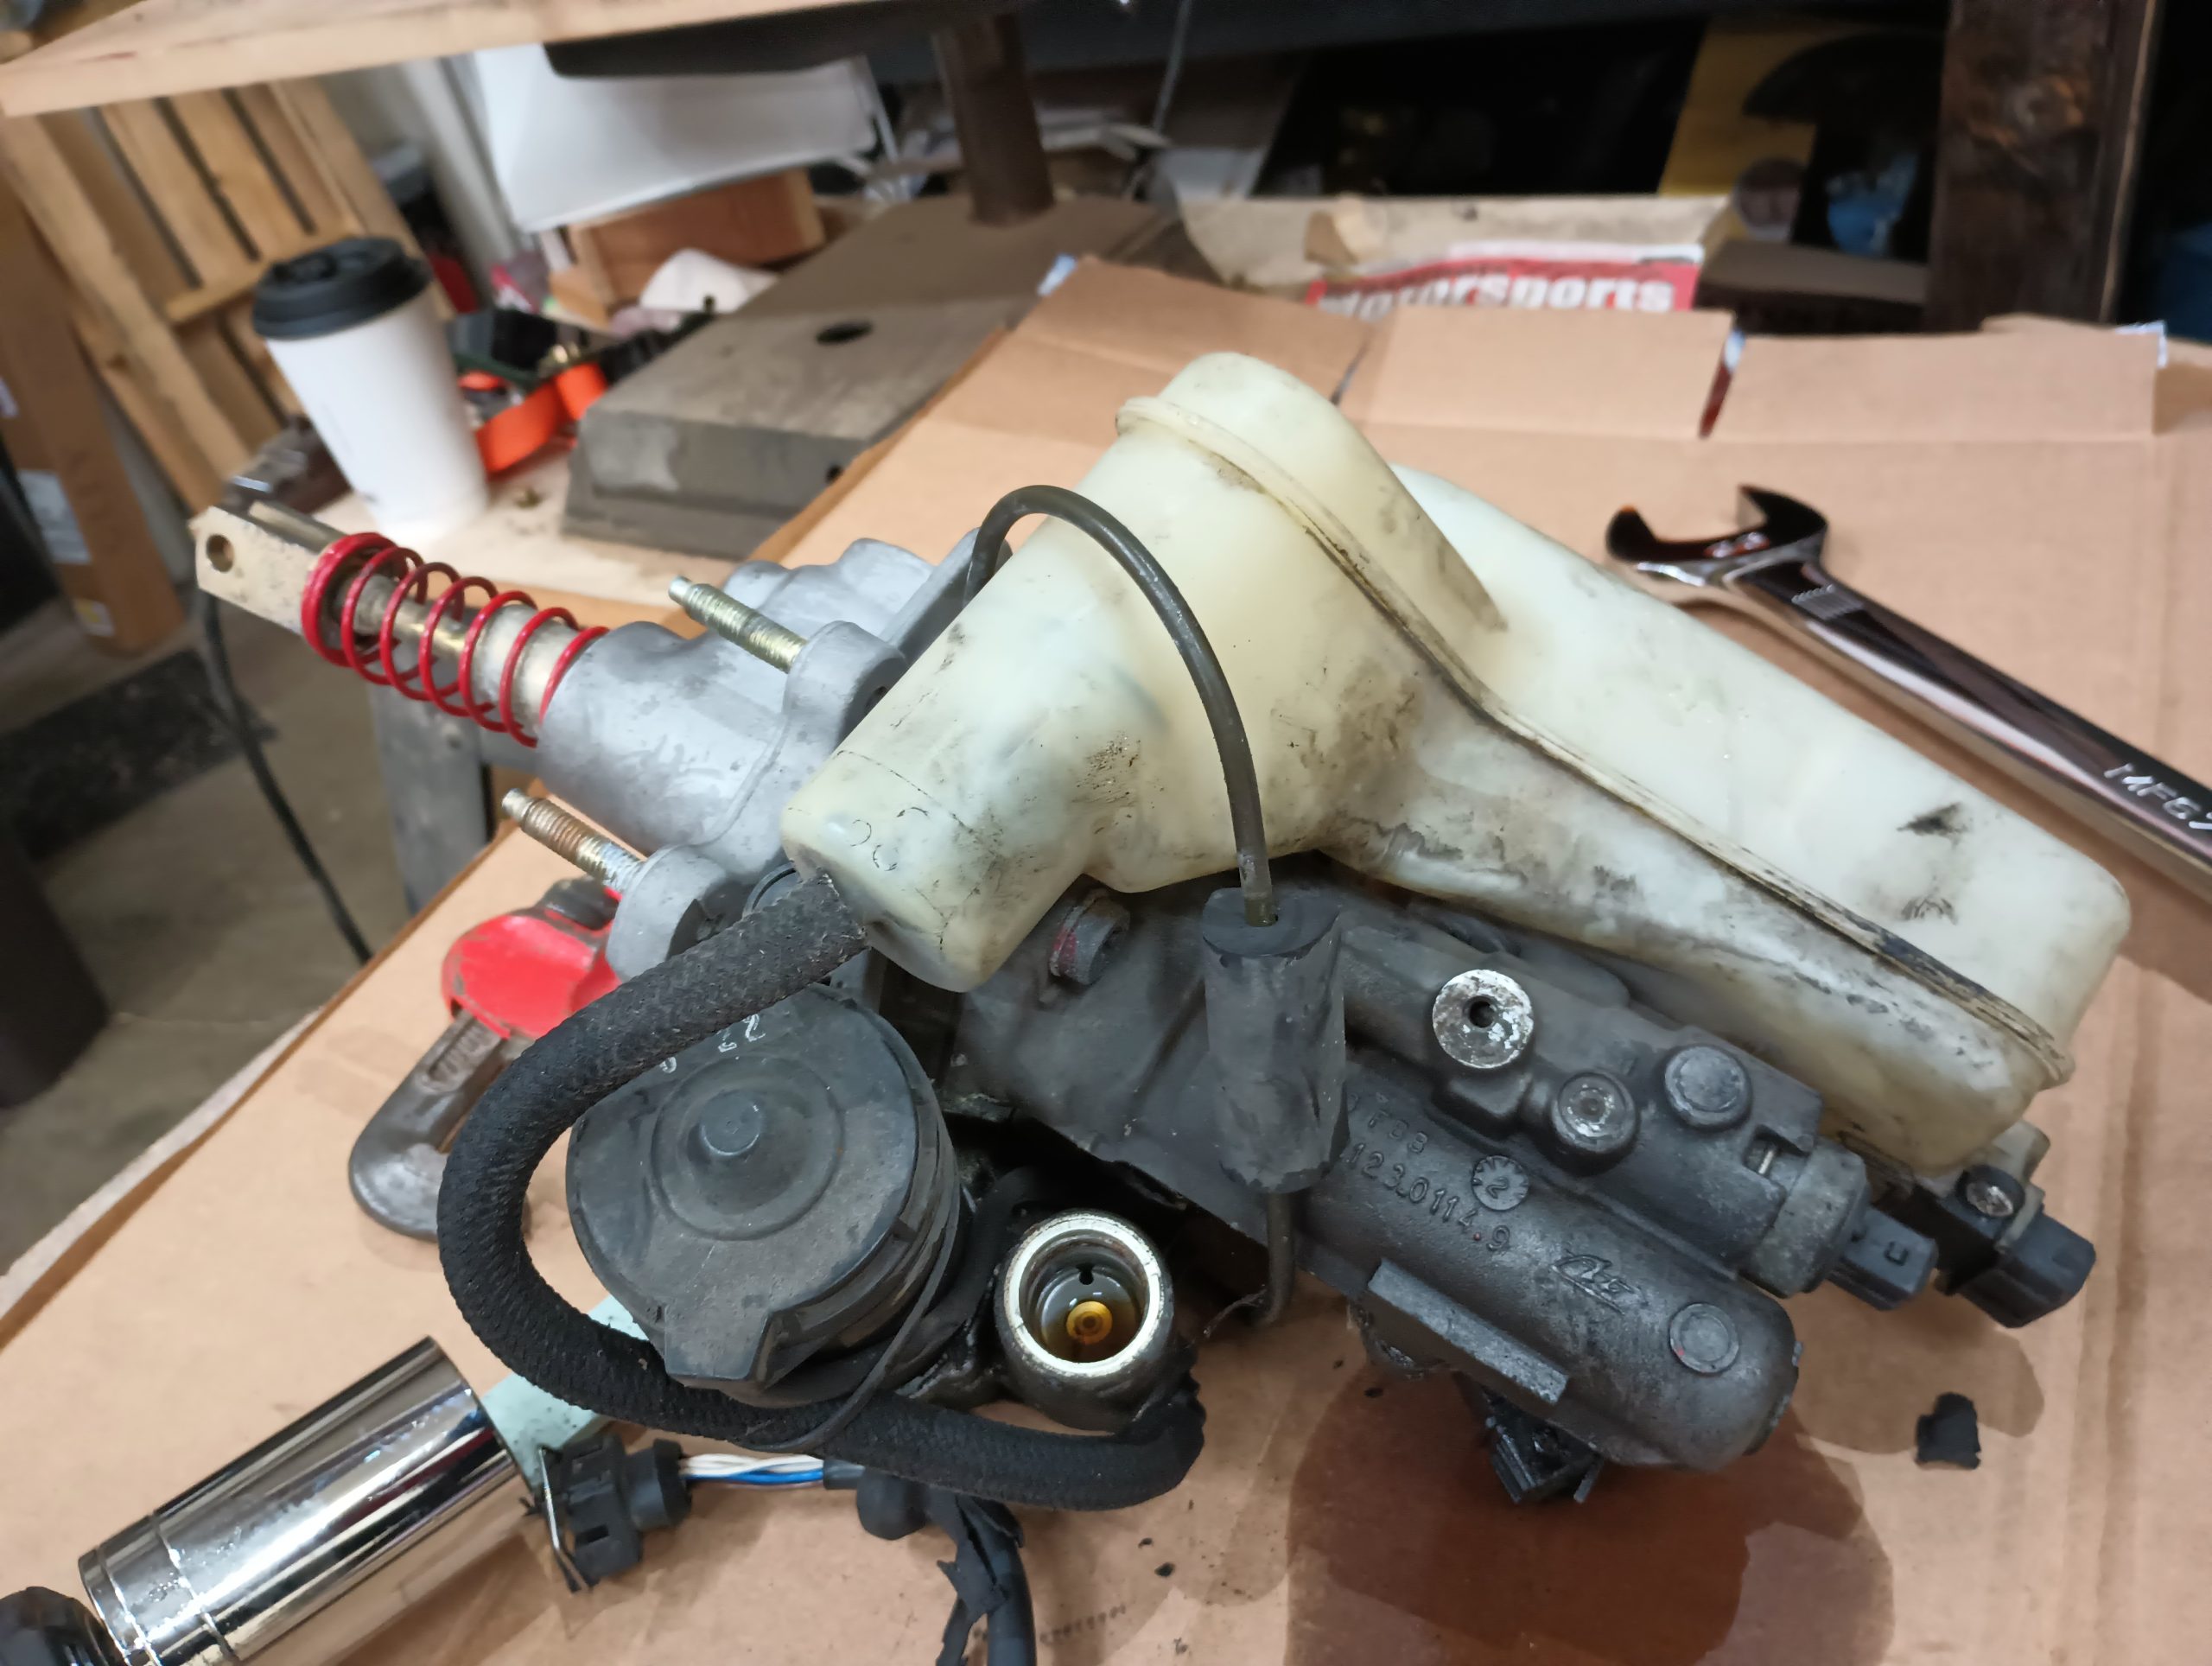
The brake system in the Saab 900 is different from what I’m used to. They have a completely self-contained ABS system that uses a brake master cylinder, an electric pump to provide power-assist to the hydraulics, a brake fluid pressure accumulator, a brake fluid pressure controller, an ABS valve block, an ABS ECU, and a separate ABS fuse block. It’s the same braking system from ATE/Teves – the ATE ABS MK II – that was used in some Fords, Alfa Romeos, Jags, the Buick Reatta, and a bunch of others that I’m forgetting right now.
While the process was a very lengthy one, it distills down to one very important lesson: When you’re trying to fix a problem that someone else already tried to fix, you really never know exactly what symptoms are real and which have been caused by troubleshooting.
Without having an opportunity to speak to the previous owner that tried to repair this – and it wasn’t Powar – I have no way to know for certain, but I believe that someone discovered that the brakes weren’t working and rather than correctly diagnosing the problem as a failed brake fluid pressure switch, they managed to destroy most of the electronics in the brake system. My first discovery was that the relay that was in the socket for the Brake Pump Relay was completely incorrect. While most standard automotive relays have the #85 pin located directly opposite the #86 one, ATE decided on a special relay for their brake system where the #85 and #30 pins were swapped. Thus a standard relay – which is what I found in the pump socket – was not able to properly trigger the pump. My original plan was to simply re-wire the socket so that a standard relay would fit in there, but another GRM forum member, Procainestart, had a spare relay and offered to send it to me as a gift.
While I waited on that, I did some additional checking and troubleshooting and discovered that the two diodes in the ABS system were also failed, so I ordered replacements for those as well. The day before the package from Procainestart was to arrive, I happened to be walking past the main fuse and relay box and touched my hand to the cover. A half-step later, I froze in place realizing that something wasn’t right but taking an extra beat to discern that I felt something warm. Odd that something in the fusebox would be warm when the car hadn’t been started for some time! Stepping back, I removed the cover, felt around, and immediately found that the fog light relay was rather toasty. Not to a temperature that would be dangerous, but certainly warmer than a relay for lights that don’t exist on a car that has the circuit for those non-existent lights turned off should be! A closer look revealed that the relay was the missing pump relay! At some point, someone must have decided to swap relays since there weren’t any fog lights anyway and they both had the same type of plug.
With that mystery solved – and the gifted relay returned with much gratitude! – I was able to read through the wiring diagrams to determine that the brake fluid pressure switch was faulty. Unfortunately, these are not easy to come by and appear to be priced in the $500 range. In a junkyard down in Louisville, however, there was a 1993 convertible that – if intact – should have had the same brake system with the same pressure switch. It was time for my daughter to be introduced to the joys of the junkyard!
We returned with the entire brake master cylinder assembly that included the pump, switch, and accumulator for the low price of under $20. While there we also scored a new ignition switch and a spare brake pump relay – both of which went on to the spares shelf. The accumulator was as non-functional as the one that was already on the car, but a new one from FCP Euro coupled with the pressure switch gave us functioning brakes!
But the dash lights were still acting up and the ABS light was on with no ability to show any codes. So still not good.
It is at this point in our story that the reader is going to need to close their eyes and imagine a common trope from TV and movies. Think of the character that everyone knows is a lunatic who has disorganized notebooks with cut-out newspaper articles and nonsensical scribbling all over. Their house has every flat surface overrun with stacks of papers, diagrams, books, and drawings. A wall is covered with pictures and clippings that have push pins tied with strings connected to other push pins. Their gaze is unfocused and off into the distance while their stubble is unchecked and their hair is unkempt. You have that image? That was me for about a month.
We tried so many different things and so many experiments to try to determine why the lights on the dash were acting the way they were. I spent my evenings poring over the wiring diagrams trying to follow the current. There were sheets and sheets of scribbled notes about what components were connected to what other components and what tests had been tried. I had pages and pages of the service manual printed out, some with several copies so I could mark them up or have a copy to stay on my desk, one on the dining room table, one in my backpack, one at the shop, and another couple copies that I had abandoned in various places by accident. My family began referring to the giant sheaf of paper as my “crazy-person papers” and I was in no position to argue the point. I was nearly to the point of being ready to just get rid of the car but I decided to try one last test – de-pinning all of the connections on the gauge cluster’s left-side connector and pinning them in one-by-one.
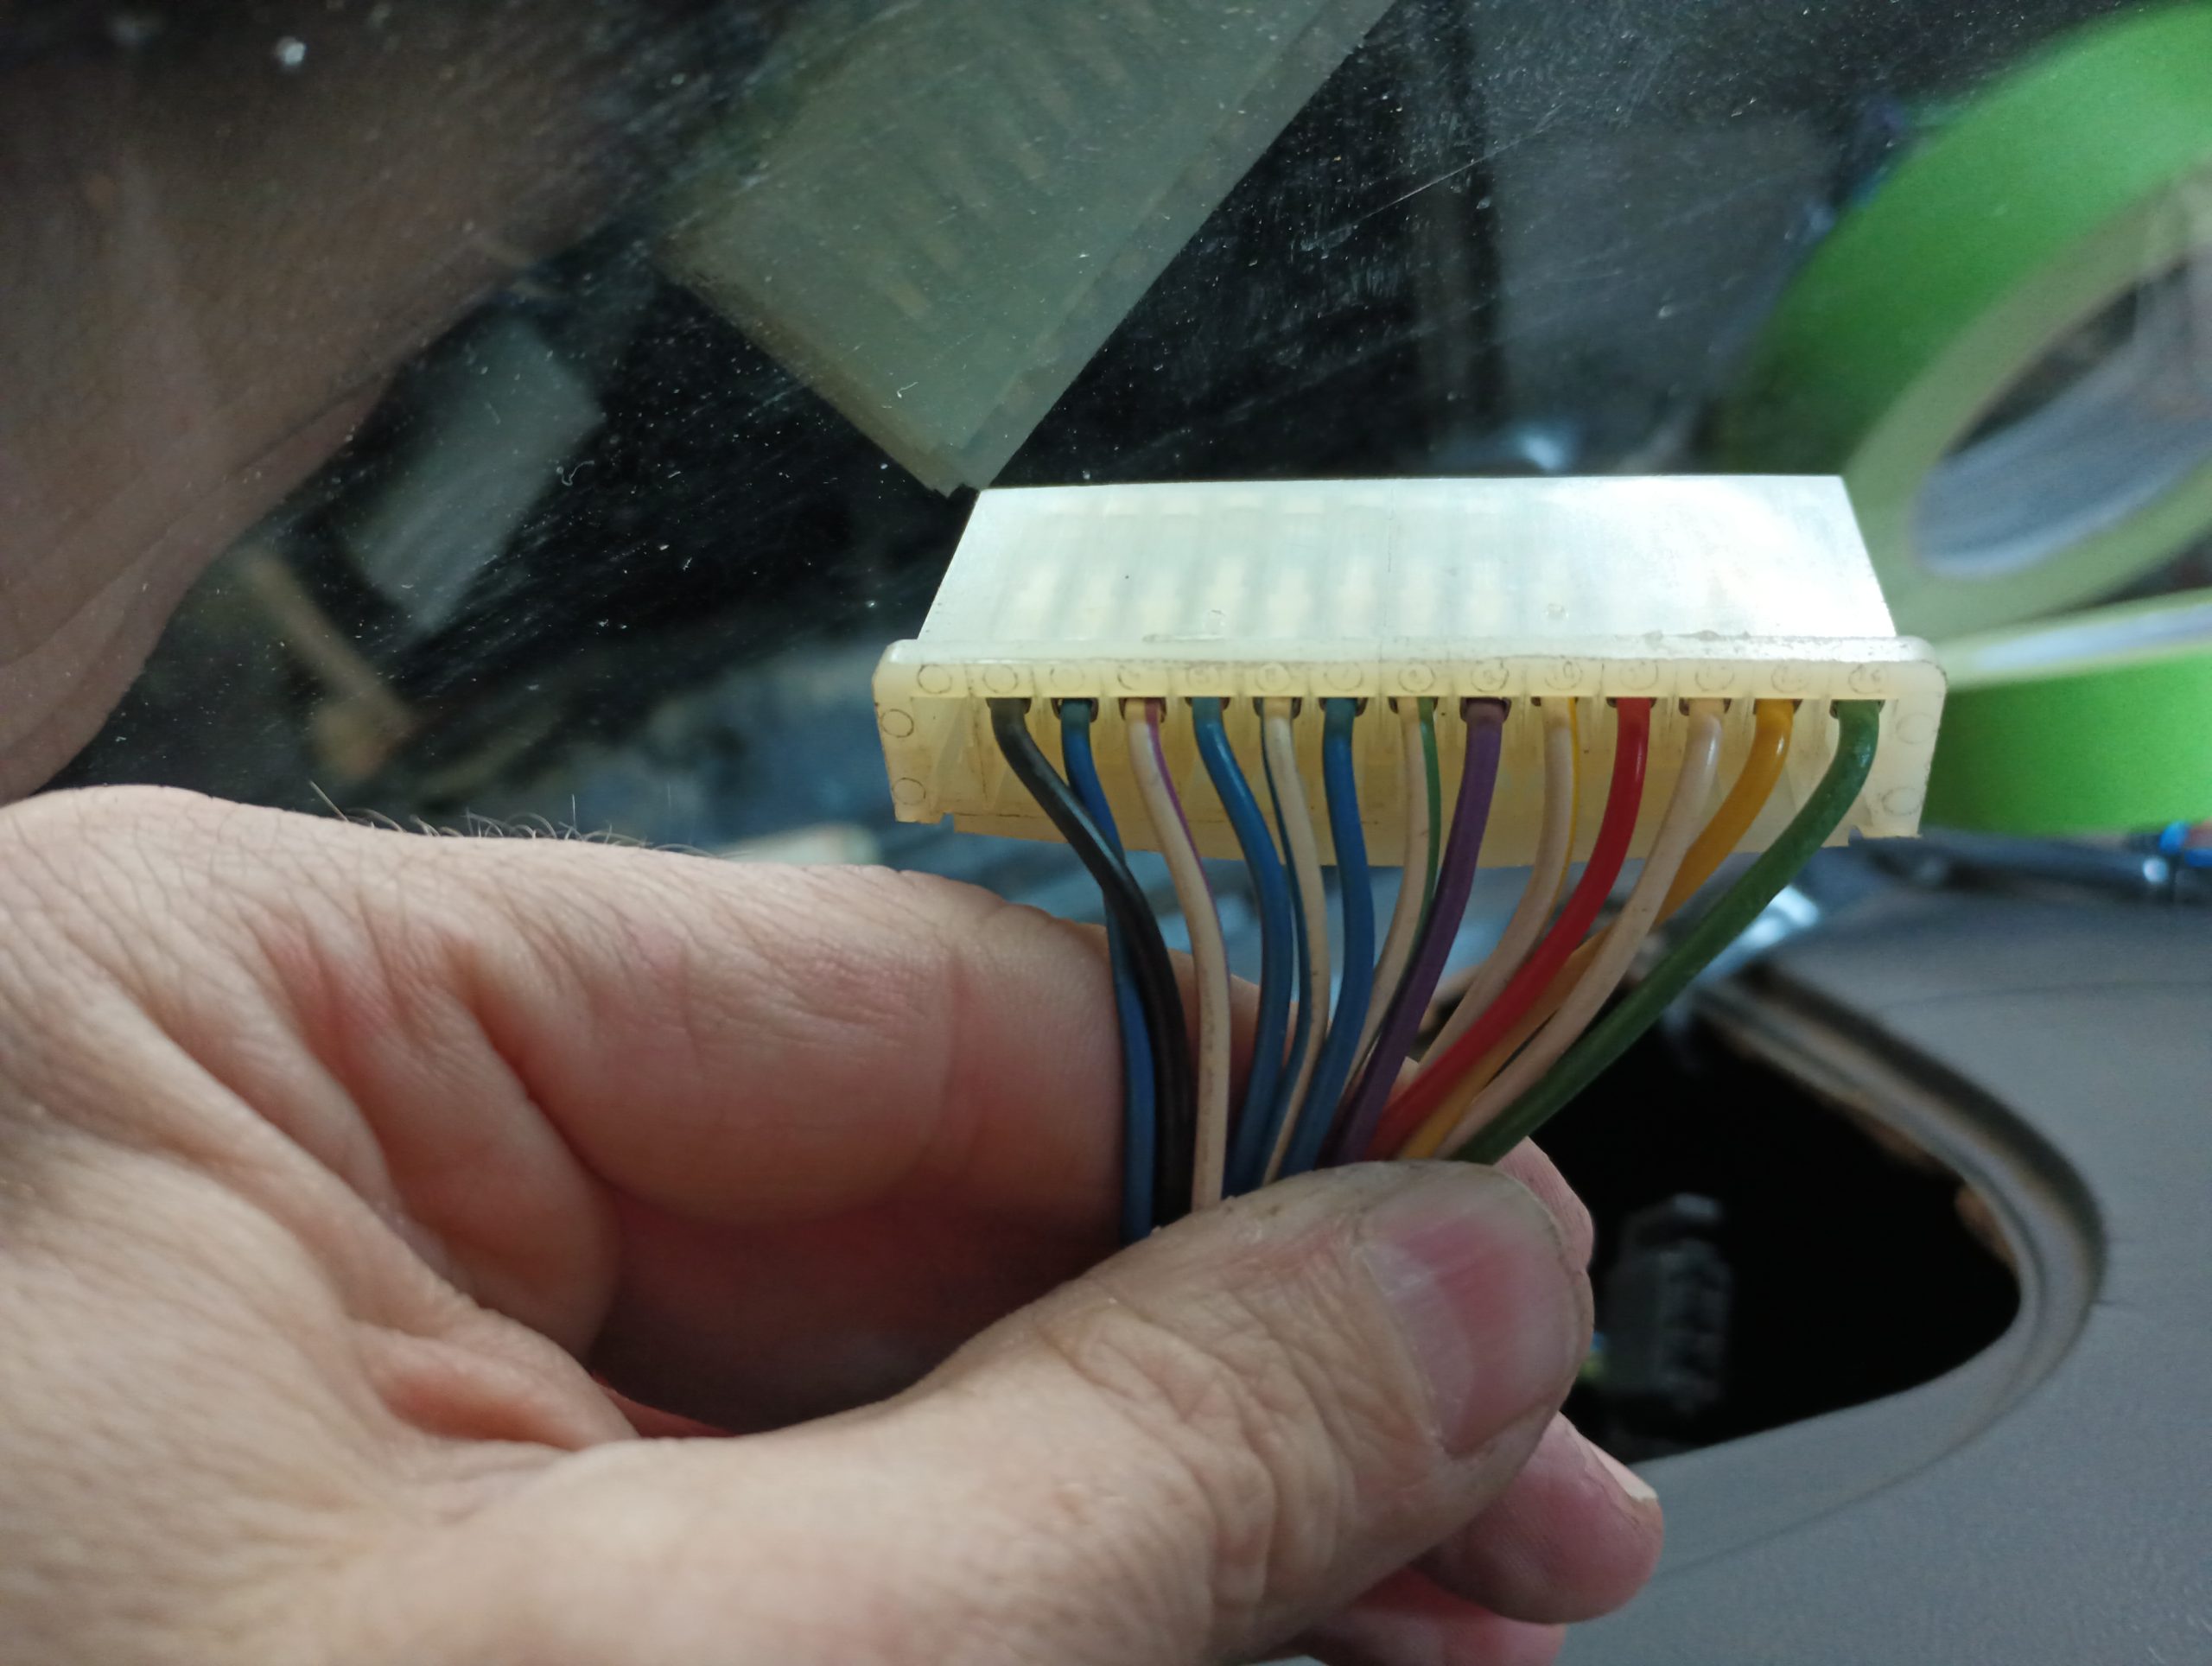
It was during this test that I finally discovered what had been vexing me for an entire month. The oil pressure and charge lights get their positive voltage from a fuse box connection that runs through one of the pins on the left side gauge cluster connector. That pin was relaxed just enough to not make contact with the cluster. Without that connection, the voltage was back-feeding through the other side of the cluster through the connection to the brake fluid and parking brake lights, causing them to light up. Now that the pin was bent back a little bit and it had good contact, the only light left on the dash was the ABS light. That was a simple problem solved by installing a replacement ABS ECU. My assumption is that during their troubleshooting efforts, they managed to put voltage somewhere it shouldn’t have been which toasted the diodes as well as the ECU itself.
The final step was to plug the MAF sensor back in – someone at some point had unplugged it for “reasons” – and to put new belts on. The initial drive was mostly successful – by hitting a pothole, I discovered rather suddenly that one of the clamps for the boost pipe was completely loose – but a quick roadside fix had everything running 5×5. Finally!
As long as it didn’t rain, of course.